XDCC
DOWNLOAD HELP
It's farily simple to download from xdcc
bots. All you need to do is idle in the chan until you see the file(s)
u want.
Example:
=-> <+WO-XDCC01> ** 5 packs ** 3
of 3 slots open, Record: 1126.2KB/s
=-> <+WO-XDCC01> ** Bandwidth Usage ** Current: 0.0KB/s,
Record: 1126.7KB/s
=-> <+WO-XDCC01> ** To request a file type: "/msg
WO-XDCC01 xdcc send #x" **
=-> <+WO-XDCC01> #1 8x [1.1M]
*APP* 1st.SMTP.Server.v2.0.
=-> <+WO-XDCC01> #2 2x [6.5M]
*APP* Active.MediaMagnet.4.3.
=-> <+WO-XDCC01> #3 0x [1.9M]
*APP* Shareware
;) v1.0.
=-> <+WO-XDCC01> #4 4x [6.1M]
*APP* Logview.v3.0.
=-> <+WO-XDCC01> #5 3x [979K]
*APP* Tabview.v2.20.
=-> <+WO-XDCC01> ** Brought to you by #WarezOasis Thanks....
**
=-> <+WO-XDCC01> Total Offered: 16.6 MB Total Transferred:
4.44 GB
This is the common layout of an Xdcc advertisement.
Say you want the Sample files of "
*APP* Shareware
;) v1.0.",
As you see on the left of the item, there is a number ( #x
), this is the packet number.
In this example we want pack number #3,
that would make us do:
=-> /msg
WO-XDCC01 xdcc send #3
This would either send the pack directly to you, or queue it until
there is a free slot
for the transfer.
If your new to Mirc ( or similar ), and you dont get this working,
make sure your dcc
options are set properly ( Ignore off ).
You can find these options at: File>Options>DCC>folders.
FSERV
DOWNLOAD HELP
Fservs run an advertisement
of some sort, each vary from eachother but they all have a
trigger you have to copy and
paste in channel to get the goods here is an example of a
fserv ad.
<NICKNAME>
File Server Online Triggers:«/ctcp Give
me ShareWare» Min:«5 Kbs»
Sends:«1/1» Queues:«10/10»
Accessed:«255 times» Online:«0/4» RCPS:«144.1
Kbs by NoOne»
Served:«2.05G in 7 files»
Current BW:«144.1 Kbs» AQT:«3hrs 5mins»
MOTD: -= Enjoy the ShareWare
;) =- —I-n-v-i-s-i-o-n—
The trigger for this ad is /ctcp
Give me ShareWare. So
we just copy the trigger and
paste it in the channel in irc
and a dcc chat session will start between you and
the fserver. You will probably
get some welcome message or something once its done
you type DIR
to get a directory listing of the files or folders it will look something
similar to this.
<YourNick>
dir
<Fserv> [\*.*]
<Fserv> SHAREWARE
<Fserv> DA DEMOS
<Fserv> FREEWARE
<Fserv> test.rar 1.45 mb
<Fserv> ad.v4.113.installer.exe
1.90 mb
Items that are in all CAPITAL
letters are usually directorys and the files are the ones with
file extensions like .rar, .exe,
.zip and so forth. After you get the Directory and files listing
you find what you like. Lets
say we wanted test.rar we have to type: Get
test.rar after you
type that it should either
send the file to you or que it untill a slot is available on the fserv.
If you decide you want to go
into the folder Shareware you would type: CD
Shareware.
that will now take us into the
directory Shareware, once inside do a DIR again and get the
list of the files inside the
new folder. To navigate back to the folder you was before you
went into the new one simply
type: CD.. and that will
take you back. Once you are done
you either type Exit or click
the X in the top right corner of the dcc chat session to close it.
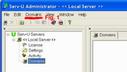
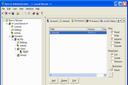
Servu
Ftp
Once you have your seru ftp server installed
open it up and at the top double click domains (fig. 1)
 (Click
to Enlarge)
(Click
to Enlarge)
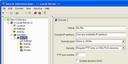
Choose New domain. It will then
ask for your ip, you can either put your ip in if it always stays
the same or if your not sure
what your ip is or if it even stays the same just leave it blank and
it
should use the correct one itself.
Next it wants a name for your new domain, chooose something
like "My FTP" anything
will work. For a port you can choose almost any port between
1 and 65535 if the one you
choose dont seem to work just try another it could be in use by another
program. After you choose
a port it will ask if you want to store the information in the .ini
file
or your reg. choose to store
it in the .ini file. You should now have something that looks like
this...
 (Click
to Enlarge)
(Click
to Enlarge)
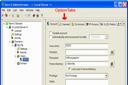
Now you are ready to setup user
accounts so people can login and use your ftp service. To do so,
Start with the users
option below "My FTP" (highlighted in the picture above)
do a right click and
choose new
users. It will prompt you to enter a account
name for the new user you want to add,
you can make it whatever you
like but for this help we will use TEST. Next it ask for the password
you want the new user to have,
once again you can make it anything but we will use TEST.
Home Directory, This is the
folder you want the new user to be able to access such as something
like c:\Files\FTP. Next option
is if you want to lock the user in the home directory, usually you
do
unless for some reason you want
the user to be able to access another folder elsewhere on the system
thats not inside the current
one, so you do probably want to choose yes. If everything went correct
you
should have something like this
picture....
 (Click
to Enlarge)
(Click
to Enlarge)
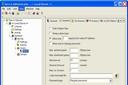
In this picture above you can
see option tabs on the rightish top. Choose the General
tab
You will find some options on
the general tab, check allow only __ login(s) from same ip.
also set a max number of users.
The other options on this tab are optional and your choice
if you wanna set them. You might
have something kinda like this below.
 (Click
to Enlarge)
(Click
to Enlarge)
Next we need to choose the Dir
Access tab. On the right side you will have a
box with your home
directory, left click the directory
once to highlight it. To the right of it there is Read, Write, Append,
Delete, Execute, List, Create,
and Inherit check boxes. The type of account your making determines
which to use if its a Upload
account you
need: Read, Write, Append, Create, List and Inherit.
You may possibly give the person
Delete, and Remove if you trust the user to Delete files and Remove
folders. If the Account is a
Download account
you probably only want to give: Read, Append,
Inherit and List. (Note: Never
check Execute unless you really trust the user, they can run programs
or
other harmfull stuff!) You should
now have something like this below depending on which type of
account you setup. The picture
shows a common download setup.
 (Click
to Enlarge)
(Click
to Enlarge)
All you need to do now is
turn the ftp server on by clicking on the <<Local
Server>> tab on the left menu options.
Click on the Start Server button
if its not already on, also you might want to check or uncheck start
the server
with windows option. After all
of that is complete you have finished
setting up your Serv-U ftp server. :)
If you are getting an error
message saying *** You have a DCC pending, Set
your client to receive the transfer.
(150 seconds
remaining until timeout) *** there are two possible
reaons for this. 1. You may need to set your
irc
client to accept the dcc. To do this goto File>Options>DCC>folders
once there set the DCC IGNORE
option
to disabled,
and uncheck the turn back on in 3 minutes check
box. 2. After checking all this and the
XDCC
bot is still telling you that error message the bot is probably broke
and does not work anymore, if this
is
the case please message an active channel op "@" and tell
them the bot does not work.